Showing posts with label #Healthy. Show all posts

Winter Makeup Inventory!

Wednesday, January 7, 2015


Greetings Divas! Let's talk makeup! A few weeks ago, I executed a complete overhaul of my makeup case. I threw out products that were old and expired, and I purchased new items to replace them. I even purchased a new set of makeup brushes...mine were getting a little old. So what prompted this makeup purge? Well, I like to take inventory of my makeup twice each year: once in the Spring, and once in the fall. Guess what...I forget to take inventory both times last year (gasp!). But wait...let me explain! Last year was super busy for me both at work and at home, and I just...forgot! Now, I don't want you all to think that I was using old makeup all year; I just purchased new items when the old ones ran out. But I still had a bunch of expired products that were still hanging around past their shelf life. 

If you are a veteran Chronicles reader, you know that I am a true believer in maintaining a fresh and clean makeup bag. I like to take good care of my skin, and using old and expired makeup can adversely affect the health of our skin and eyes (the worst offender by far is old mascara). As such, I needed to right my wrong and get rid of my old makeup. And that's what I did!

In the spirit of maintaining our health and youth, we should all take regular inventory and toss out old makeup that may be damaging to our skin and eyes. Here are a few tips to ensure that your makeup case is fresh:

1. Commit to taking inventory of your makeup in alternating seasons (i.e. Summer and Winter, or Fall and Spring).

2. Once you toss out your old makeup, make a list of the replacement products you need and head out to your favorite department store and/or pharmacy to snag them.

3. Make a note of when you purchased the new product and give it an expiration date based on its shelf life. Using stickers or a marker to make expiration labels are easy options.

And now for the shelf life list! Here are the shelf lives of the most common types of makeup: 


Foundation (Oil Free) – 1 Year
Foundation (Cream or Compact) – 1½ Years
Concealer – 1 Year
Powder – 1½ to 2 Years
Blush – 1½ to 2 Years
Eye Shadow – 1½ to 2 Years
Mascara – 3 Months
Eyeliner – 1½ to 2 Years
Lipstick – 1½ to 2 Years
Lip Liner – 1½ to 2 Years
Lip Gloss – 1½ Years

Be well Divas!


Smoothie Packs for Busy Divas!

Saturday, January 3, 2015


The Problem - You are not getting your daily allotment of fruits and vegetables. You are super busy, and you habitually neglect to make fruits and vegetables a priority during breakfast and lunch. Sadly, you have come to the realization that an apple pie from McDonald's probably should not count as a fruit, even if you get two for $1. And the nutritional value of the lettuce and tomatoes from your Whopper is probably negated by the other ingredients. You need to do something...and you need to do it quickly...your skirt and blouses are getting a little too tight, and you refuse to buy a larger size...refuse! And you just made a bet with your girlfriends to see who is going to look the best in their swimsuit when you all head to St. Lucia at the end of April. Something's gotta give!

The Solution - Substitute at least one meal per day with a fruit and vegetable smoothie.
  
The Objective - To make a quick, healthy, and tasty smoothie in a short amount of time.

The Set Up - You need to gather fruits and vegetables, Greek yogurt, and other smoothie accouterments. You also need a blender and a really cute on-the-go sippy cup...because the ugly ones make for an unattractive smoothie :) !

The Prep - Create smoothie packs for the week:

- Head out to the supermarket or your local farmers' market and purchase strawberries, blueberries, blackberries, raspberries, peaches, pineapple, spinach, and kale. Also grab a box of plastic sandwich bags, single-serve containers of plain and/or vanilla-flavored Greek yogurt, your favorite fruit juice (I like V8 Fusion), your favorite dairy/soy product (I like vanilla-flavored soy milk), honey, and any other items you like to add to your smoothie (i.e. wheat germ, protein powder, etc.).

- When you get home, properly wash all of your fruits and veggies. In a large bowl, combine all of your berries and mix. Slice and dice your peaches and pineapples, add them to the bowl, and mix. In a separate bowl, chop and combine spinach and kale leaves.

- Grab your sandwich bags. Scoop about one cup of fruit and one cup of veggies in each bag and seal it (be sure to let as much air as possible out of the bag before sealing). Place bags into the freezer.

The Execution - When you're ready for a smoothie, grab a fruit/veggie pack. Toss the contents into a blender with your choice of juice or dairy/soy product, yogurt, and other items and blend. Pour into your sippy cup and go!


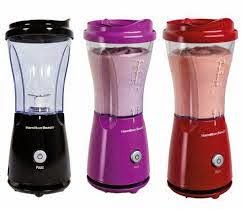
If You're A Smoothie Pro - If you intend to make your smoothie at the office, think about purchasing an on-the-go blender. I use the Hamilton Beach single-serve blender (pictured above), which I purchased for about $12. Before you leave the house for work, grab your bag of fruits and veggies and other smoothie accouterments. Throw them in an insulated lunch bag with an ice pack, and head out. When you get to the office, toss your lunch bag in a refrigerator (if possible). When you're ready for your smoothie, grab your blender and go at it. 

So, how many of you will try making smoothie packs? If you're game, let us all know your strategy and how it turns out!


Healthy Snacking Delivered Straight to the Office...Thanks Graze!

Monday, April 28, 2014


Quick story (I promise!)....a couple of weeks ago, a friend/colleague introduced me to a new way of snacking in the office. She was walking around the office with a box full of snacks. I was intrigued...a box full of snacks! Who doesn't  love snacks?! When I asked her what she was eating, she told me it was a Graze box. We were heading into a meeting, so I didn't bother to ask for more details. A little later in the day, I walked back into my office and saw that she had left a little "coupon" for the Graze box on my keyboard. She also sent me a link to the Graze website. I had no clue what I was about to get myself into, but I went to the website anyway...snacks were involved! And once I checked out Graze.com, I was all in!

If you are as excited about snacks as I am, you are probably begging me to tell you about this Graze box. Graze is a service that delivers fresh boxes of healthy snacks to your home or office on a periodic basis. Each box contains 4 snacks (there are over 90 options), and is composed of healthy foods, including nut and seed mixes, dried fruits, crackers, dips and dippers, and other natural snacks. How do you get your box? You go to Graze.com and create an account. During the registration process, you input the address to which you want your Graze boxes delivered, and the frequency of your deliveries (i.e. weekly, every two weeks, once per month, etc.). You can even go through the catalog of snacks and select whether you want to try it, like it, love it, or trash it. Once your account is created, you can log on to see which snacks are on their way to you. You can also see and rate the snacks in the boxes you already received. My first Graze box was delivered to my office last week. Check it out!


Each Graze box costs $6, and is billed to the credit card you place on file during registration. I used my friend/colleague's code when I signed up, and ended up getting my 1st and 5th box for free...yay for me! And, you can modify your delivery preferences or cancel your subscription at any time. 

So, why am I sharing this information with my fellow Divas and Gents? For one, many of us professionals who spend a lot of time in the office are more likely to snack throughout the day. Why not snack on something healthy? After all, beach weather is right around the corner...cakes, cookies, and chips are not conducive to the Summer body you spent all Winter creating. Each Graze box boasts a number of healthy benefits, each of which are noted on each package and represented by appropriate symbols. Each snack is also perfectly-portioned, so there's no post over-indulging guilt...there's no time for that!


Overall, I am super impressed with the concept of the Graze box. I enjoyed my snacks over the course of a week, and not once did I feel bad about what I was consuming. I can't wait to get my next box!

If anything I've written in this post is of interest to you, do yourself a favor and head over to Graze.com. Get your healthy snacking on!  


Side note: Just so you all know, I was not compensated in any way by the wonderful owners of Graze. I am simply a humble attorney looking for healthy and tasty snacks to get me through my busy day...without adding extra inches to my hips...you dig?!

The Best Skin Care Tips Ever! So I've Been Told!

Sunday, March 31, 2013


Greetings Divas! In business, one's appearance is key. It is important to always put your best face forward when networking, meeting with current or potential clients, or making presentations. As such, it is important to take care of your skin and make sure that your outward appearance is not a distraction from your talent. Over the years, I have learned of many different ways to care for my skin with the hope of maintaining a healthy, youthful appearance. In the spirit of sharing (as always!), I have compiled a list of the best skin care tips that I've gathered from my fellow Professional Divas. Check them out and be sure to add any additional tips in the comments section.


Remove Your Makeup Before Bed - I must confess, I have not been a girl scout when it comes to removing my makeup before bed. I have woken up plenty of mornings with makeup on my pillows after making the conscious decision to not wash my face the evening before. As I get older, however, I realize that my laziness is unacceptable...especially when my skin is at stake. So what have I done to improve my habits? I began purchasing makeup remover cleaning wipes. It's a quick and easy way to remove my makeup before bed when I'm feeling too lazy to do a traditional wash.


Moisturize - I am far from a dermatologist, but I know how itchy and tight my skin feels after showering. I find that the best way to combat this feeling is to moisturize. I usually go for a fragrance-free, lightweight moisturizer with SPF....which leads right into my next tip...


Use SPF...Every Day - SPF is not just for when the sun is hot. In fact, the best dermatologists recommend that women, and men, wear SPF year-round to protect against a variety of skin problems, including wrinkles and certain skin cancers. My daily moisturizer has an SPF of 15, which helps to protect my skin throughout the year.


Reduce Stress - We've discussed this before, haven't we? Stress can be a contributing factor for a variety of different health ailments, including skin issues. While stress can be a regular part of a Professional Diva's life, finding ways to reduce and/or eliminate stress can be beneficial to your health...and your skin. Looking for some stress-reducing tips? Check out my past posts: Stress and the Professional Woman, and 6 Easy Ways to Eliminate Stress That You Probably Haven't Thought Of.

Drink Lots of Water - As human being, our bodies are composed primarily of water. Drinking an adequate amount of water helps to keep us hydrated, which in turn can help keep our skin moisturized by hydrating skin cells. In other words, drink lots of water for better-looking and better-feeling skin.


Eat Well - I've always been told that what you put inside of your body will inevitably show up on the outside. In other words, our diets can dictate what pops up on skin. Simply put, eating healthy food (including fruits, vegetables, and whole grains) can help ensure that your skin looks healthy and vibrant.


Keep Your Makeup Fresh - This is something that I have discussed on the Chronicles on several occasions. Outdated and dirty makeup can have devastating effects on your skin. As such, I like to take an inventory of the items in my makeup bag and purge those products that have expired. The most important thing is to know the shelf life of your favorite items. Check out my post, Fall Makeup Inventory, to learn more.


Have a great week!


SpaFinder Wellness Week 2013!

Monday, March 4, 2013


Divas and Gents, it's that time of year again! Wellness Week 2013 begins in just one week! For those of you who don't know, Wellness Week is your chance to improve the way you look and feel with exclusive spa treatments and wellness offerings at discounted prices (some 50% off!). You can choose from a variety of services, including massages, private training, laser hair removal, and teeth whitening. Also, Wellness Week is a great opportunity for you to take a step back and evaluate how you are taking care of yourself; sought of a health check for your body. Wellness Week will take place at hundreds of spas, yoga, Pilates and fitness studios and wellness centers across the country.

Are you game? Wellness Week will run from March 11 - March 17, 2013, so check out the SpaFinder Wellness Week website and search for a participating spa in your area. Also, be sure to take the Wellness Week Pledge:

1. Change your breakfast;
2. Choose to move;
3. Hydrate;
4. Connect with nature;
5. Make sleep a priority;
6. Embrace the power of touch; and
7. Give yourself the gift of silence. 

We work hard every day, and a little pampering at half the price is definitely welcomed. Oh...if you head over to the website now, there's an offer for a $25 Wellness Week Bonus card. In the spirit of sharing....!!!

Have a great week!


Quick Meals For a Busy Diva...Pineapple Teriyaki Salmon!

Sunday, February 10, 2013

Photo Credit: Randy Mayor
Well, over the past month or so, I've noticed that I have been eating way too many meals outside of my home. I'm talking breakfast, lunch, and dinner! And I really can't use the excuse that I've been too busy at work to prepare meals. After all, I'm always busy at work...but I also have several recipes in my arsenal that I can prepare fairly quickly. So this week, I've decided to "check myself," and make a greater effort to cook more. And since I am always in a sharing mood, I decided to share the following recipe for Pineapple Teriyaki Salmon that I came across last year. Of course, this recipe is courtesy of my favorite food magazine/website, Cooking Light. This is a dish that I have prepared many times at home, mainly because it tastes delicious and I can prepare it quickly. It's also pretty healthy, which is always a plus. So, check out this recipe for Pineapple Teriyaki Salmon, a be sure to let me know how you like it. Enjoy!

 
Ingredients (Yields 4)
2 tablespoons brown sugar
2 tablespoons low-sodium soy sauce
1 teaspoon finely grated orange zest
1 (6-ounce) can pineapple juice
1/2 teaspoon salt, divided
2 teaspoons canola oil
4 (6-ounce) salmon fillets (about 1 inch thick)
1/4 teaspoon freshly ground black pepper
Grated orange rind (optional)

Recipe
- Combine first 4 ingredients and 1/4 teaspoon salt in a small saucepan over high heat, and bring to a boil. Reduce heat, and simmer until reduced to 1/4 cup (about 15 minutes). Set aside.
- Preheat oven to 400°.
- Heat oil in a large nonstick skillet over medium-high heat. Sprinkle both sides of salmon with remaining 1/4 teaspoon salt and black pepper. 
- Add fish to pan; cook 3 minutes. 
- Turn fish over and place in oven; bake at 400° for 3 minutes. 
- Remove from oven; brush 1 tablespoon sauce over each fillet. Return to oven, and cook 1 minute or until fish flakes easily when tested with a fork or until desired degree of doneness. 
- Sprinkle with orange rind, if desired.

How many of you are frequent home cooks? About how long do you typically spend preparing your meals?


Dr. Oz's Green Drink!

Tuesday, January 8, 2013


Greetings Divas and Gents! As some of you may know, I have recently become a huge fan of Dr. Oz. There's something so comforting about him, and I love the fact that he is always sharing ways to better one's health. I recently found myself stalking browsing Dr. Oz's website, and I came across the recipe for his Green Drink. Some months ago, I started making fresh fruit and vegetable smoothies to enjoy on my way to work. After doing so for a while, I found myself feeling more energized at the beginning of the day, and less hungry. So when I came across the Green Drink, I was all in!

According to Dr. Oz, the Green Drink is high in fiber, low in calories, and full of important vitamins. For those of you who are habitual breakfast skippers, this may be a great option for you. Prep the ingredients the night before, throw them in the blender in the morning, pour it into a travel container, and go...it's definitely worth a try! If you so dare, here is the recipe for Dr. Oz's Green Drink:

Ingredients
2 Cups of Spinach
1/2 Cucumber
1/4 Head of Celery
1/2 Bunch of Parsley
1 Bunch of Mint
3 Carrots
2 Apples
1/4 Orange
1/4 Lime
1/4 Lemon
1/4 Pineapple

Recipe
Combine all ingredients in a blender. 
(Yields 28-30 ounces, or 3-4 servings)

Just a quick disclaimer: I have not yet tried the Green Drink, so I'm not sure how it tastes. I intend to try it this weekend, and tweak it to my liking. If any of you have tried the Green Drink, let us know how you like it. Also, let me know if you intend to try it...maybe we can exchange notes!

Happy Blending!


Quick Meals For A Busy Diva...Shrimp-Stuffed Shells!

Saturday, January 5, 2013


Photo Credit: Johnny Autry; Styling Credit: Mary Clayton Carl

Greetings Divas! We've made to another weekend! For me, the weekend provides much needed time to do those things that I've neglected during the week...like cooking. Now, just because it's the weekend and I have a few moments to cook a good meal, it certainly doesn't mean that I want to hang out in the kitchen all day. Especially when the mall is calling me! 

Cut to Cooking Light, my favorite cooking magazine. I love the recipes presented in this magazine because they taste delicious, they can be made in a short amount of time, and they often pack a healthy punch. The Shrimp-Stuffed Shells recipe is no exception. I've made this dish on several occasions, and it's amazing...deliciously amazing! And it only takes me about a 35 to 45 minutes to prepare, which gives me more than enough time to cook and make it to the mall for doorbusters! Check out this recipe for Shrimp-Stuffed Shells...courtesy of Cooking Light magazine. Enjoy! 

Ingredients
  • 20 uncooked jumbo pasta shells (about 8 ounces)
  • 1 1/2 tablespoons olive oil
  • 1/2 cup chopped shallots
  • 2 tablespoons minced garlic (about 6 cloves)
  • 1/2 cup (4 ounces) 1/3-less-fat cream cheese
  • 1/4 cup 2% reduced-fat milk
  • 1/4 teaspoon ground red pepper
  • 1/3 cup chopped fresh basil
  • 1 pound medium shrimp, peeled, deveined, and coarsely chopped
  • 1 tablespoon potato starch
  • Cooking spray
  • 3 cups lower-sodium marinara sauce (such as McCutcheon's), divided
  • 1/3 cup (1 1/2 ounces) grated fresh Parmigiano-Reggiano cheese

Recipe

1. Preheat oven to 400°.

2. Cook pasta 7 minutes or until almost al dente, omitting salt and fat. Drain well.

3. Heat a medium skillet over medium heat. Add oil to pan; swirl to coat. Add shallots; cook 4 minutes, stirring occasionally. Add garlic; cook 1 minute, stirring constantly. Add cream cheese, milk, and pepper; cook until cheese melts, stirring until smooth. Remove from heat. Stir in basil. Place shrimp in a bowl. Sprinkle with potato starch; toss well to coat. Add cream cheese mixture to shrimp; toss well. 

4. Divide shrimp mixture evenly among pasta shells. Coat a 13 x 9-inch glass or ceramic baking dish with cooking spray; spread 1 cup marinara over bottom of dish. Arrange shells in prepared dish; top with remaining 2 cups marinara. Sprinkle shells evenly with Parmigiano-Reggiano cheese. Bake at 400° for 30 minutes or until shrimp is done.

If you would like to check out the recipe online, click here! Let me know how it goes! Enjoy shopping cooking!


International Stress-Reduction Tips!

Thursday, January 3, 2013


Stress is evil...plain and simple! And I am always on the lookout for different relaxation methods. I've actually tried several things, which have generally had favorable results: spinning...running...ditching my cell phone...each of these have been effective in the past, but I am always open to new things!

The truth is that being a professional and dealing with the everyday ups and downs of Corporate America usually brings unintended and unwanted stress. Unfortunately, too much stress can have negative effects on your physical, emotional, and mental health. For example, chronic stress can trigger headaches, chest pain, and elevated blood pressure. Additionally, stress can be attributed to insomnia and alcohol/substance abuse, as well as physical aches and pains. And for professional women of child-bearing age, stress can also be a contributing factor in infertility.

Needless to say, it is imperative that professional women find ways to avoid and relieve the daily stress we encounter, both at home and in the work place. As a constant seeker of stress-reduction methods, I was pleasantly surprised when I came across an article in the Huffington Post entitled "Stress-Reduction Tips From Around the World." I was all in! The article took a look at stress reduction methods from Sweden (taking a few coffee breaks), India (head massages), Japan (going shoeless at work), Finland (sweating it out in a sauna), and West Africa (dancing). The article is highly interesting, so in the interest of sharing I am passing it on to you! Do yourself a favor and check it out!

What are some of the methods you use to destress? 

About the FitBit.....

Monday, December 3, 2012

Photo Credit: FitBit.com
Is it just me, or has there been an overabundance of articles floating around the Internet stating that one's life expectancy is shortened if she works at a job where she sits most of the day? And to make things worse, these articles say that even if you workout religiously, it does not negate the fact that you are sitting down all day. Now, I am one of those people who sits at a computer or in meetings for most of the day. As was the case at the beginning of my career, I no longer run around courtrooms all day...I am now what they call "sedentary." Ugh! Such an awful sounding word! And, as I said, it doesn't matter that I work out 5 days a week...I am still considered sedentary!

My first reaction in reading these articles was to panic, which lasted approximately 5 minutes (no more, I swear!). My next reaction was to come up with a list of ways to move my body more during work hours. Made the list...blogged about it...made some changes. But I still felt like I needed something quantifiable where I could actually see the results of these changes...clearly, the lawyer in me had taken over. Luckily for me, a combination of events and necessities caused me to stumble upon the FitBit. Have any of you heard of this device? Well, give me a couple of minutes and I'll explain...

The FitBit is sought of like a pedometer with super powers. It's a tiny, wireless device that you clip to your shirt, pants, belt buckle, bra, etc., and it tracks the amount of steps you take on a daily basis. Additionally, the FitBit tells you how many calories you burn, how many miles you walk, and how many flights of stairs you climb throughout the day. Nice, right?! The FitBit also syncs to a free online program that permits you to log your food and activities, and track your weight. And of course you can earn badges for meeting certain milestones, and you know us adults love badges! Depending on the type of FitBit, the device may also double as a sleep tracker. It tracks when you fall asleep, and the amount of times you wake up throughout the night. It is a pretty neat feature for someone like me who generally has difficulty sleeping, and who may want to show the results to a sleep specialist.

Photo Credit: Ashstar01
So now that you have a general idea what a FitBit is, I can freely explain to you how the FitBit has helped to reduce the amount of time I spend sitting all day. It's actually a really simple explanation...the FitBit proved to me in unmistakable numbers that I was lazy. Sure, I go to the gym for an hour and a half a day, but during the other 22 and half hours...LAZY! After seeing my raggedy stats, the answer was pretty clear...I needed to move my tail a whole lot more. And I did!

I started taking 10 minute walks around my office three times a day. I began parking my car far away from the entrance of my office, the gym, the supermarket, or any place with an entrance. I boycotted the elevators at my office and forced myself to walk up the stairs. I closed my office door and jogged in place for 5 minutes at a time. I walked around my house a lot more than I normally would. I walked Q in the park an extra 10 minutes per day. I really was making an effort to increase my activity. And let's be honest...I was really trying to outsmart my FitBit. Whatever works right? And then the plot thickened...

In addition to its overall fabulousness, the FitBit program also allows you to connect with friends to challenge each other to walk and move more. I mean it ranks you against them and everything. So it adds a competitive element while helping you to be less sedentary. All in all, the FitBit has been a great accountability tool for me, and I think it will help other professionals that sit during most of the day.

So, that's the FitBit in a seriously quick nutshell...it does so much more than I can possibly describe in one post. Please check out the FitBit website to get more information on the different devices and additional online features. And you (and your waistline) can thank me later!

Disclaimer: FitBit did not pay me to rave about this product. Please be assured that these are my opinions free from any commercial or financial influence....seriously!


Don't Sleep On Healthy Options!!!

Sunday, March 18, 2012

Pineapple Upside-Down Cake

Greetings Divas and Gents! And welcome to the beginning of another productive work week. I usually don't start off the week with recipes, but I couldn't wait to share this one with you all. Over the past few years, I have developed somewhat of a sweet tooth. Every few days or so, I crave something sweet...cake, cookies, candy, anything with sugar in it! Obviously, partaking in this habit is never beneficial to my waistline...or my hips...or my thighs...you know where I'm going with this!

As some of you may know from my previous posts, I am a big fan of Cooking Light Magazine. Their recipes always taste great, and they're healthier for you than their traditional counterparts. So when I started getting a craving for Pineapple Upside-Down Cake, I immediately went to Cooking Light's website in search of a recipe...and I found one! The recipe looked easy and simple, and I already had many of the ingredients in my cabinets. I made a trip to the supermarket to retrieve the rest of the ingredients, and I was ready to make my cake.

As always, Professional Divas and Gents love numbers...they put everything in perspective. Check out these nutritional stats:

Classic Recipe
367 Calories Per Serving
367 Milligrams of Sodium
14 Grams of Fat

Cooking Light Recipe
264 Calories Per Serving
280 Milligrams of Sodium
7.9 Grams of Fat

Ingredients
- 1 (20-ounce) can pineapple slices in juice, drained
- Cooking spray
- 1/3 cup fat-free caramel topping
- 9 maraschino cherries, drained
- 5 tablespoons butter
- 2/3 cup sugar
- 2 large eggs
- 1/2 cup low-fat buttermilk
- 1 teaspoon baking powder
- 1 teaspoon vanilla extract
- 1/4 teaspoon salt
- 1/4 teaspoon baking soda
- 1 1/4 cups all-purpose flour

Recipe
1. Preheat oven to 350°.


2. Press 9 pineapple slices between paper towels until barely moist; set aside. Reserve the remaining pineapple for another use.


3. Coat a 9-inch square baking pan with cooking spray; drizzle caramel topping over bottom of pan. 

4. Arrange prepared pineapple slices in a single layer over caramel; place 1 cherry in the center of each slice.


5. Place the butter in a large microwave-safe bowl. Cover and microwave at high 1 minute or until the butter melts. Add sugar, stirring with a whisk. Add eggs, and stir well. Stir in low-fat buttermilk and next 4 ingredients (buttermilk through baking soda). Lightly spoon 1 1/4 cups flour into dry measuring cups, and level with a knife. Add flour, stirring just until blended (do not overstir). Pour the batter into prepared pan.

6. Bake at 350° for 30 minutes or until a wooden pick inserted in center comes out clean. Cool for 1 minute in pan on a wire rack. Place a plate upside down on top of the cake, and invert onto plate. Cool completely. Cut cake into squares.

My next suggestion is to get a few of your friends to help you partake in the deliciousness that is the Pineapple Upside-Down Cake. And make sure you enjoy it with the satisfaction of knowing you are eating a lower calorie, lower fat version of cake...and it takes good!

To view the Cooking Light recipe, Click Here!
 
For other delicious recipes courtesy of Cooking Light, check out its website at www.CookingLight.com. 


Don't Sleep On Healthy Options...Part Two!

Wednesday, December 7, 2011

Bacon, Ranch, and Chicken Macaroni and Cheese


Happy Hump Day Divas and Gents! As you may recall, a few months back I shared with you a recipe for macaroni and cheese that I found in my Cooking Light Magazine. The recipe shaved a whopping 500 calories per serving from the traditional mac and cheese recipe by substituting butter, eggs, and full-fat milk with butternut squash, skim milk, and non-fat Greek yogurt. While I was initially skeptical as to how the mac and cheese would turn out, I was pleasantly surprised by the results…it was delicious! (See Previous Post Here!)


I received a lot of positive feedback after posting this recipe…even from those who were expecting another martini recipe! As such, I thought it prudent to share yet another mac and cheese recipe that also sheds hundreds of calories from the traditional recipe. This time, Cooking Light suggests bacon, garlic powder, onion powder, and chicken to create the decadent Bacon, Ranch, and Chicken Macaroni and Cheese. I tried this recipe a couple of weeks ago, and it was AMAZING! Even more amazing are the nutritional stats (Because Professional Divas love stats!):


Classic Recipe
908 Calories Per Serving
963 Milligrams of Sodium
36 Grams of Saturated Fat

Cooking Light’s Recipe
497 Calories Per Serving
545 Milligrams of Sodium
7.4 Grams of Saturated Fat


WINNING! Now we can have our mac and cheese and eat it too! Check out the recipe for the Bacon, Ranch, and Chicken Macaroni and Cheese.


Ingredients

8 ounces uncooked elbow macaroni
1 slice applewood-smoked bacon
8 ounces skinless, boneless chicken breast, cut into 1/2-inch pieces
1 tablespoon canola oil
1 tablespoon all-purpose flour
1 ½ cups fat-free milk
1/3 cup condensed 45% reduced-sodium 98% fat-free cream of mushroom soup, undiluted
¾ cup (3 ounces) shredded six-cheese Italian blend (such as Sargento)
½ teaspoon onion powder
½ teaspoon garlic powder
½ teaspoon chopped fresh dill
1/8 teaspoon salt
Cooking spray
½ cup (2 ounces) shredded colby-Jack cheese


Preparation

1. Cook pasta according to package directions, omitting salt and fat; drain.

2. Cook bacon in a large nonstick skillet over medium heat until crisp. Remove bacon from pan, reserving drippings in pan. Finely chop bacon; set aside. Increase heat to medium-high. Add chicken to drippings in pan; sauté 6 minutes or until done.

3. Heat oil in a large saucepan over medium heat; sprinkle flour evenly into pan. Cook 2 minutes, stirring constantly with a whisk. Combine milk and soup, stirring with a whisk; gradually add milk mixture to saucepan, stirring with a whisk. Bring to a boil; cook 2 minutes or until thick. Remove from heat; let stand 4 minutes or until sauce cools to 155°. Add Italian cheese blend, onion powder, garlic powder, dill, and salt, stirring until cheese melts. Stir in pasta and chicken.

4. Preheat broiler.

5. Spoon mixture into an 8-inch square baking dish coated with cooking spray. Sprinkle evenly with reserved bacon and colby-Jack cheese. Broil 3 minutes or until cheese melts.


Voila! To see this recipe at Cooking Light Online, CLICK HERE!


For other delicious recipes courtesy of Cooking Light, check them out at CookingLight.com.


Related Posts Plugin for WordPress, Blogger...

Share My Post!